Part Numbers Overview
The parts database allows users to assign part numbers to device IDs in the project. This allows the system to generate Bills of Material and other informative lists based on the items in the schematics and the information in the database.
Part numbers are assigned to device IDs within a given project. They are not automatically assigned to the same symbols in a new project unless you copy part of an existing project with part numbers assigned.
Part numbers can be assigned to parent or child symbols. All part numbers are associated with the device family so that you can edit them from any parent or child symbol associated with that device family.
Searching for a Part Number
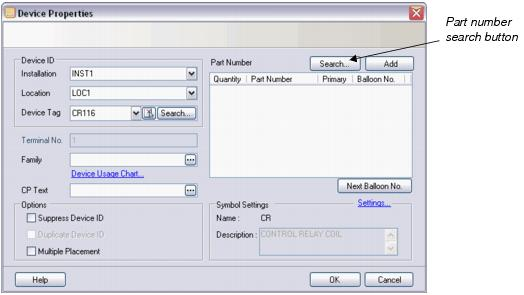
When a symbol is placed, the Device Properties dialog appears, prompting the user with a device ID for the symbol. This dialog also contains a Part Number field and a part number Search button.
Assigning Part Numbers
To assign a part number from the parts database, select the Search button. This will display the Select Part Number dialog, which allows you to search the database and make part number selections.
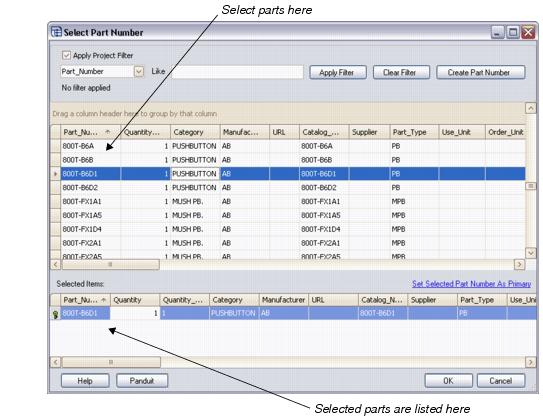
The Select Part Number dialog has a column for each data field in the parts database. You can scroll from side to side to see additional columns. You can adjust the width of the columns by dragging the edges in or out. The columns can be dragged to the left or right to change their order.
To select a part, double click anywhere on the line for the desired part. The part will then appear in the Selected Items area at the bottom of the dialog. You can assign multiple part numbers to a single symbol, if necessary. If you wish to assign more than one of the same part number, you can make an entry in the Quantity column in the lower part of the dialog. By default, the first part you select is the primary part number and is marked with a key-shaped icon.
If you change your mind and wish to un-assign a selected part number, double click on its line in the Selected Items area of the dialog.
The display of available parts initially lists any parts that are associated with the symbol that you are placing (for example, if you are in the schematic drawing mode, by the value in the Schematic Symbol column).
Sorting Part Numbers
By clicking on the column heading you can sort the listed parts by the values in that column.
Filtering Part Numbers
At the top of the Select Part Number dialog there is an area that allows you to filter the parts listing.

Select the Apply Project Filter check box to use the project parts filtering that was set up in the Default Project Properties dialog in addition to the filtering you are performing here. There is a drop-down list for selecting the parts database field to which you wish the filtering to apply. In the Like field, enter the value by which you wish to filter. This can include wildcard (*) entries such as *700* for any part numbers containing the number 700. Select the Apply Filter button to list the part numbers that match the filter. Select the Clear Filter button to remove the filter.
Additional filtering can be done using the drop-down list in each column heading that allows you to filter the listing.
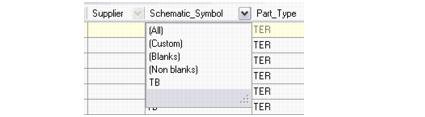
Select All to display all parts. Select Blanks to display all records with no entry in that field. Select Non blanks to display all records where that field is not empty. You can also select any values that are already displayed in that column (TB in the example above). Select Custom to create a custom filter. The following dialog will appear:

The dialog will display the name of the current data field and provides two sets of fields for entering criteria. You can use one or both sets of fields. You can relate the two sets with an And condition or Or condition by selecting the appropriate radio button. The first field for each set of criteria allows you to select whether the criteria equals, does not equal, is greater than, is greater than or equal to, is less than, or is less than or equal to the value in the second field. The following example would display parts that have either PBNO or PBNC in the Schematic_Symbol field.

Select OK to apply the filter to the parts listing.
Creating New Part Number
If you find you need to add a part number to the parts database, you can select the Create Part Number button in the Select Part Number dialog. After entering the new part number, you will be taken to the Parts Database Editor dialog where you can enter additional data.
Use the Panduit button in the Select Part Number dialog to display the Panduit Form dialog which allows you to filter and select the best available Panduit wire containment parts.
When you have selected the desired part(s), select the OK button to assign parts to the symbol. The selected symbols will appear in the Device Properties dialog.

By default, the first part you select will be marked as the Primary part number. This is the first of the selected parts that will be prompted when panel layout drawings are created. If you have selected multiple parts, you can choose a different one as primary if necessary.
You can also use the Add button in the Device Properties dialog to assign a part number. When you select this button a blank set of part number fields are added and you can enter the desired part number here without going to the parts database.
Select OK to complete the placement of the symbol. If you wish to see assigned part numbers displayed in the drawing beside the symbols, select the # button on the Display Settings toolbar. You can also use the User Options Viewing Preferences.